Smarter ecommerce billing, cleaner APIs, and stricter data integrity across orders and quotes. Learn More
Smarter ecommerce billing, cleaner APIs, and stricter data integrity across orders and quotes
July 02, 2026
New Features
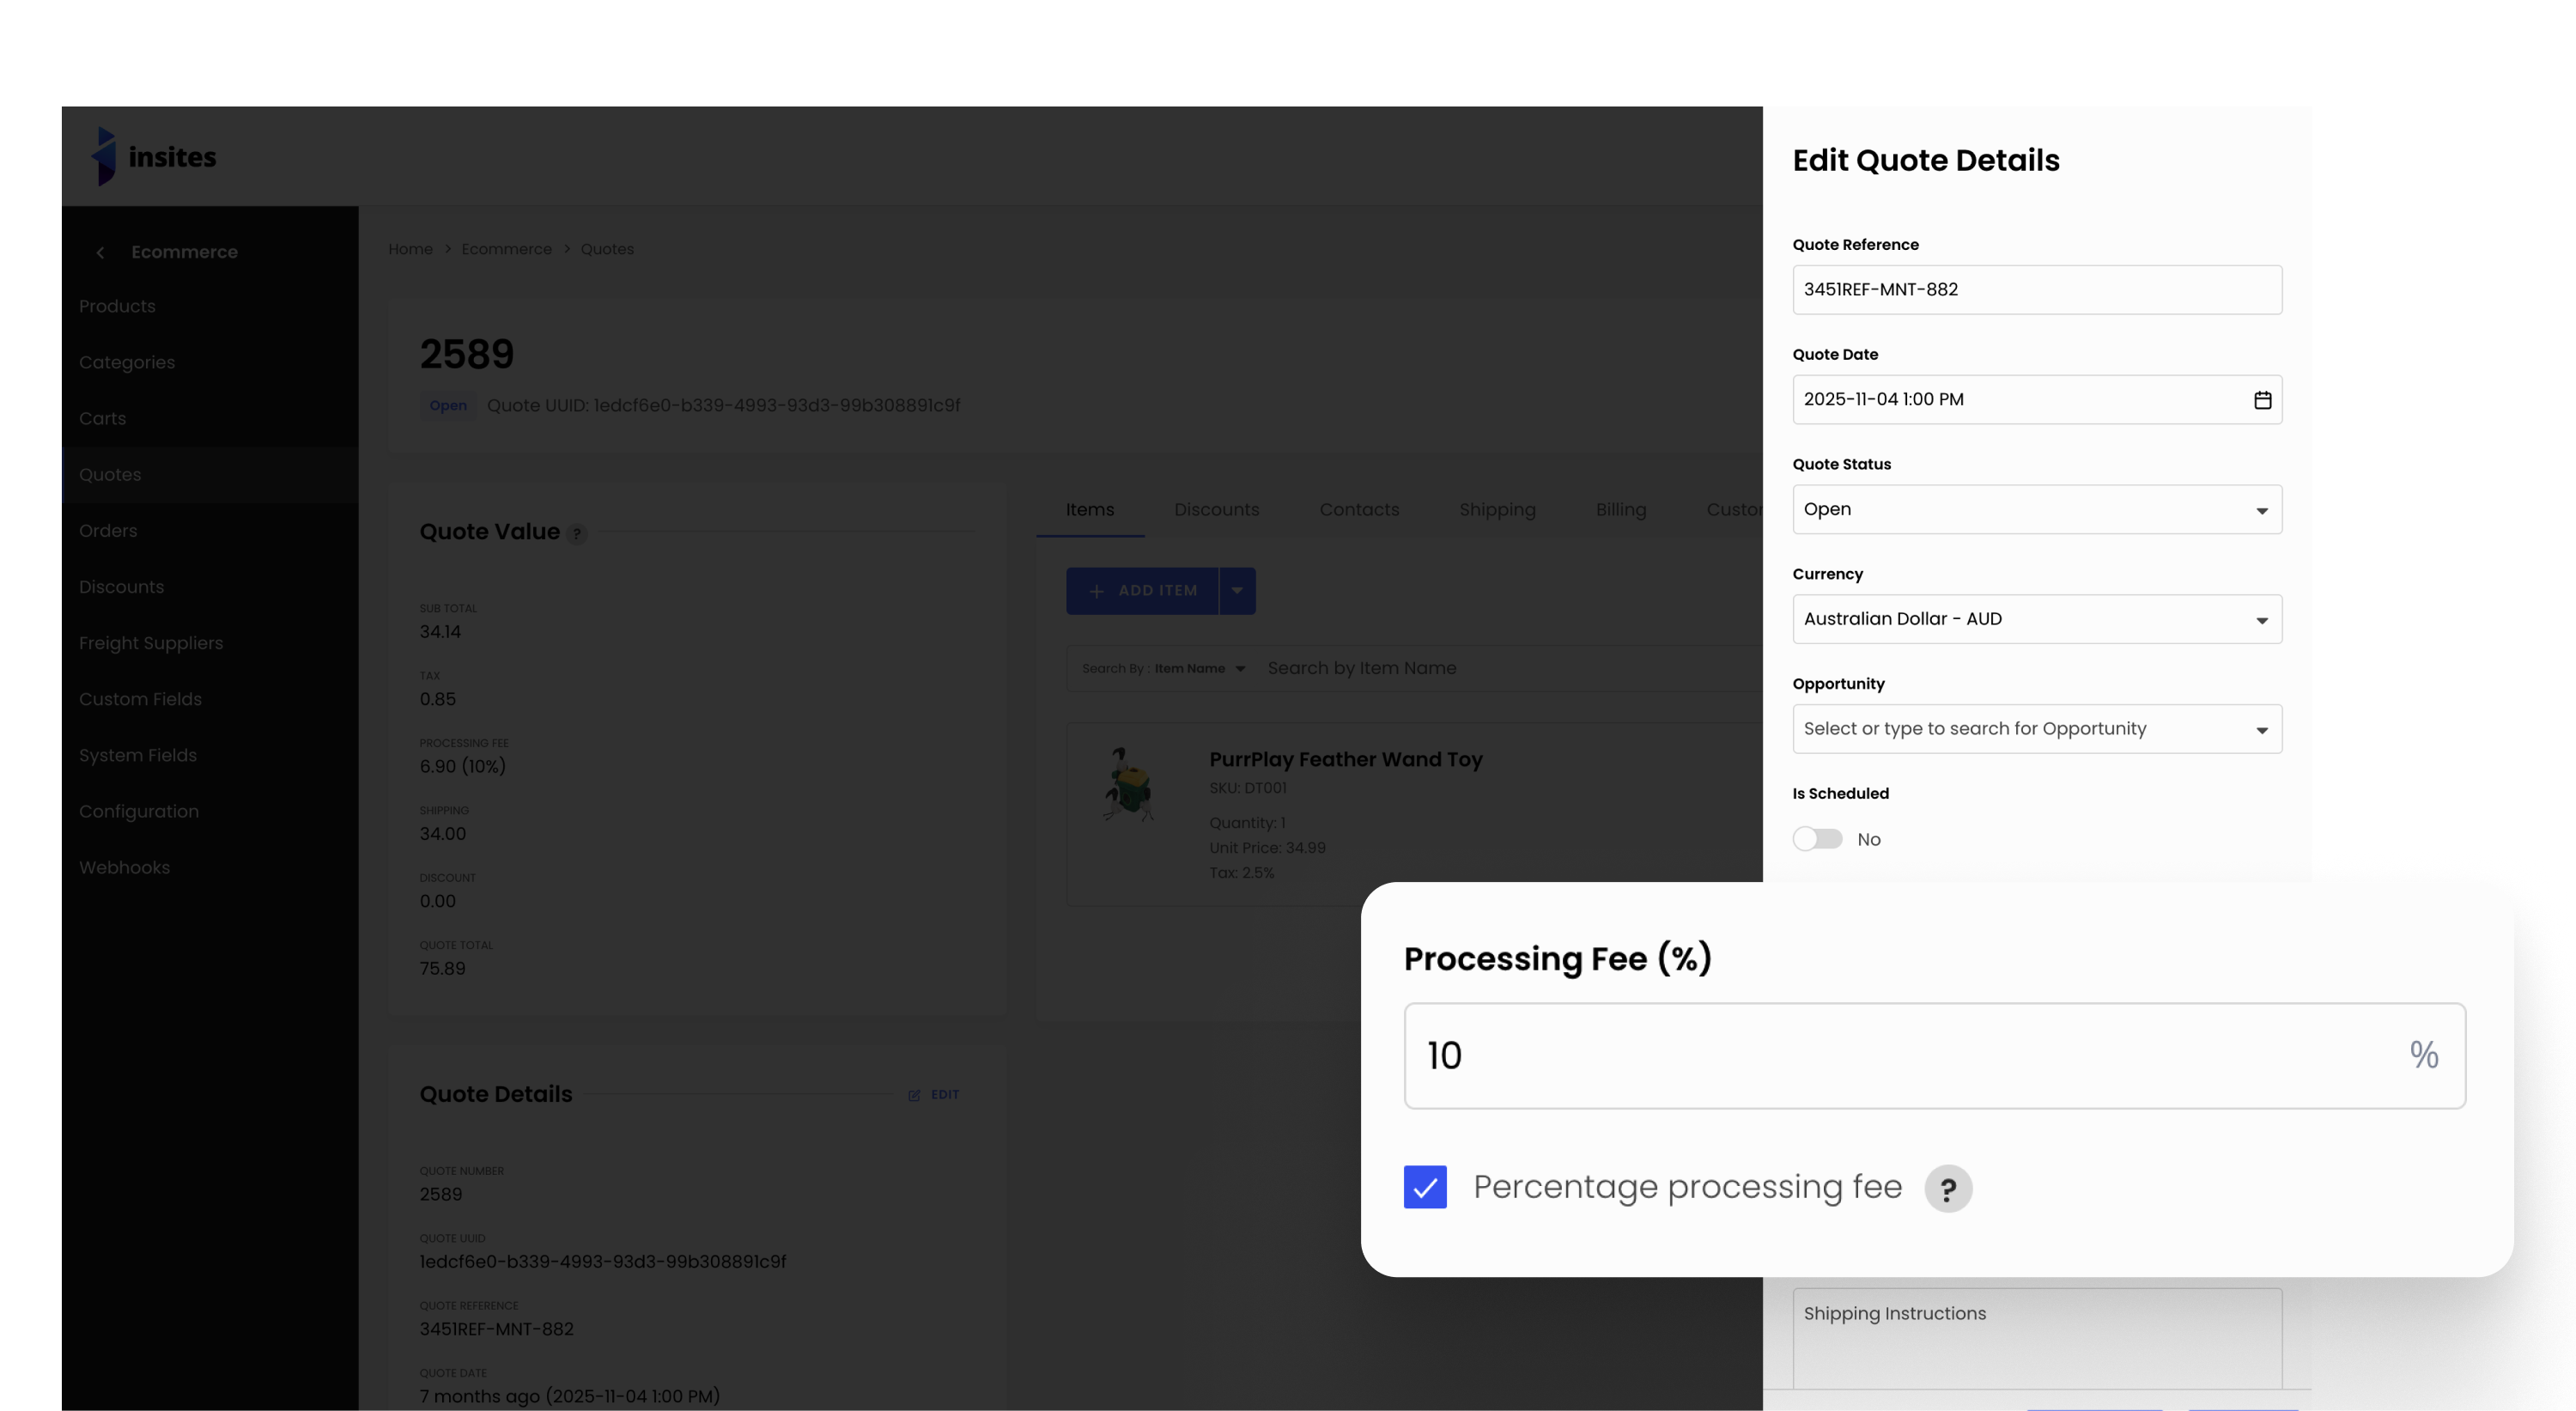
- Percentage Processing Fee — Orders and quotes now support a percentage-based processing fee via the
is_percentage_processing_feeflag (default:false/ fixed amount). Theprocessing_fee_amountis automatically computed server-side on every save using the order/quote base (subtotal + tax + shipping − discounts, clamped to $0). Applies across the v2 API, CSV import, and quote-to-order conversion. - Auto-generated Quote Number —
quote_numberis now automatically generated from the record ID on creation. The field is no longer required on POST or CSV import.
Bug Fixes
Quotes
- GET list and GET single:
items[]flattened to canonical shape;idadded to all nested objects - POST:
quote_statusdefaults toDraftwhen not supplied; enum and reference integrity validation added;quote_contact_idcorrectly derived;geo_jsoncascade fixed - PATCH: enum validation and reference integrity checks added;
quote_numbernow enforced - DELETE:
items[]flattened;idadded to nested objects
Orders
- GET list and GET single:
items[]flattened to canonical shape; doc examples corrected - POST:
items[]flattened in response;*_contact_idfields removed (not in schema);geo_jsoncascade fixed - PATCH:
items[]flattened in response;order_companycorrectly marked as not required
Order Items
- POST/PATCH: response shape corrected; null validation and UUID guards added
- PATCH: empty-string
order.uuidnow rejected - GET list:
page/sizerequired flags corrected; 400 example fixed; nestedidfields added
Order Discounts
idadded to nested order and discount objects across GET list, GET single, DELETE- POST: UUID guards and enum validation added
Order Shipping Packages
- Status enum validation added to POST
- GET list: required flags corrected; sort validation added
- DELETE 200 example aligned with live response
Payments
- POST/PATCH: reference integrity and enum validation; null protection added
- DELETE: nested order
idadded; stale enum values removed; 404 shape corrected - GET list: stale enum examples removed; unreachable 400 removed
- GET single: path param display and nested order
idfixed
Quote Discounts
- GET single 404 and DELETE 404 doc examples aligned with live response shape
- POST: reference integrity and enum validation added
- PATCH: validation and doc fixes
- GET list: unreachable 400 example removed
idadded to nested quote and discount objects
Quote Items
- POST: reference integrity validation and doc fixes
idadded to nested objects in DELETE 200 doc example
Quote Shipping Packages
- POST: reference integrity and enum validation added
- GET list:
page/sizecorrectly marked Optional - Doc: invalid enum values corrected;
idadded to nested objects
System Fields
- POST: success status corrected to 200; enum validation added
- PATCH: 404 guard and enum validation added
- DELETE: 404 guard prevents GraphQL internals leaking in error responses
Custom Fields
- DELETE now returns the deleted record; non-numeric
idvalidation added - Category and product custom field doc schema and example accuracy fixes
Configuration
- Stripe config: partial PATCH now preserves unset fields; non-boolean
livemoderejected - PATCH: empty-string rejected for
measurement_unitandweight_unit
Freight Suppliers
- Fixed size field drift in DELETE
page/sizecorrectly marked Optional in GET list doc- DELETE 200 example aligned with cURL path record
Products
- CSV SKU import is now atomic per row; duplicate SKU errors include the conflicting UUID
effective_priceis now always computed server-side on create/update and cannot be overridden via the API or CSV import- Backfill migration recalculates
effective_priceon all existing products and variants using paginated queries (500 per page) to avoid table locks
Improvements
idsub-field added to all nested relation objects (order, quote, contact, company, discount, product, product variant) across orders and quotes v2 API responses and doc examples- All v2 API doc examples updated to reflect live response shapes
- Unreachable 400 examples removed from GET list endpoints across orders and quotes
- Stale enum values removed from payments and order shipping package docs
- CSV import templates for orders and quotes now include the
Is Percentage Processing Feecolumn
Breaking Changes
- v2 API — Response shape:
items[]on orders and quotes has been flattened from{ id, properties: { uuid, ... } }to a flat object{ id, uuid, ... }across all endpoints (GET list, GET single, POST, PATCH, DELETE). Any client readingitem.properties.*will break. - v2 API — Stricter validation: Enum fields on orders and quotes POST/PATCH now reject invalid values with 400. Previously invalid values were silently accepted.
- v2 API — Reference integrity: Quotes PATCH now rejects non-existent relation UUIDs. Order items POST and order discounts POST now reject empty or invalid UUIDs.
- v2 API — Required field:
quote_numberis now required on quotes PATCH. - v2 API — Removed field:
*_contact_idfields removed from Orders POST — these were not in the order schema and are no longer accepted. - v2 API — Computed field:
processing_fee_amountis now server-computed on every save. Any client-supplied value is ignored and overwritten. Clients should stop sending this field and read it back from the response. - Products —
effective_price—effective_priceon products and product variants now always stores the ex-tax active list price. Previously it stored the rawsale_priceorregular_priceregardless of tax-inclusive flags.- Values change for tax-inclusive catalogs. Catalogs with
is_tax_included,is_sale_price_tax_included, oris_variant_sale_price_tax_includedset totruewill seeeffective_pricechange after the backfill migration runs. - Listings sorted or filtered by
effective_pricewill reorder. Re-test any storefront listing, sort, or price-range filter that reads this field. effective_priceis read-only. It is computed server-side on every create/update; values sent in POST/PATCH bodies or CSV imports are ignored and overwritten — read it back from the response.total_priceis unchanged. It stays tax-inclusive.
- Values change for tax-inclusive catalogs. Catalogs with

A redesigned API reference built for developers and AI tools
June 09, 2026
New Features
- Per-endpoint Markdown documentation, designed for use with AI assistants. Each endpoint can now be exported as a clean Markdown snippet containing the cURL and Controller request examples, parameter list, response shape, and object reference.
- "Copy for LLM" and "View as Markdown" buttons added to every endpoint — copy the endpoint's full Markdown to your clipboard, or open the raw Markdown in a new tab to share or paste into your AI tool of choice.
- Resource pages now have a sticky table of contents listing all endpoints, so you can jump between endpoints without scrolling back to the top. Responsive layout on narrower screens.
- Redesigned API documentation layout. Endpoint details on the left, live example request and response on the right — easier to scan, easier to compare an endpoint's parameters against its example output.
- Per-endpoint Markdown now includes the Controller (Liquid) example alongside the cURL example, matching what the HTML docs show.
- Search behaviour for list endpoints is now documented on the API Overview page — which fields are searchable, how
search_by/keyword/exactinteract, and how search combines with pagination and sort.
Improvements
- Endpoint parameters are now split into clearly-labelled Path Parameters, Body Fields, and Query Parameters sections — no more confusion about which values go in the URL versus the JSON body.
- Every endpoint now has a single canonical URL —
/admin/api/<module>/<resource>#<endpoint>. Older URLs redirect there automatically so existing bookmarks and shared links keep working. - Markdown export's Object section now matches the HTML resource reference — nested fields show with dot notation, object-type parents are typed correctly, and list-only query parameters no longer leak into the response shape.
- Sidebar navigation and dark mode now hold up cleanly across every module.
- Parent-resource path parameters (e.g.
event_uuidon event sponsors,cart_uuidon cart items) now show a description instead of rendering blank. - Body Fields in the Markdown export are cleaner on POST and PATCH endpoints — fixed duplicate rows and broken dot-notation paths on resources with object references.
- Body Fields no longer lists response-only file metadata (
.file_name,.extension,.url) under upload fields. The information is still available in the resource's response Object reference where it belongs. - Test Request panel cleaned up — the API URL preview now uses the same code-block styling as the Example Request, and the payload editor stays in sync with the URL preview.
- Overview and Module Versions pages now share consistent page spacing with the rest of the docs.
- Dark mode polish across the sticky example panel and sidebar.
Security
- Upgraded the
axiosHTTP client from 0.27.x (end-of-life) to 1.16.0, picking up two years of security patches and bug fixes. - Removed the bundled jQuery 1.12.4 dependency (end-of-life since 2016, multiple unpatched vulnerabilities).
Bug Fixes
- Controller examples are now valid Liquid out of the box — placeholder values are properly quoted so copy-pasting the example works without manual edits.
- DELETE endpoint cURL examples no longer include an empty request body flag.
- Locale data cached in the browser is no longer wiped when a localisation request fails — previous translations stay loaded until a successful refresh.
Track every CRM change in real time with full API coverage
June 09, 2026
New feature
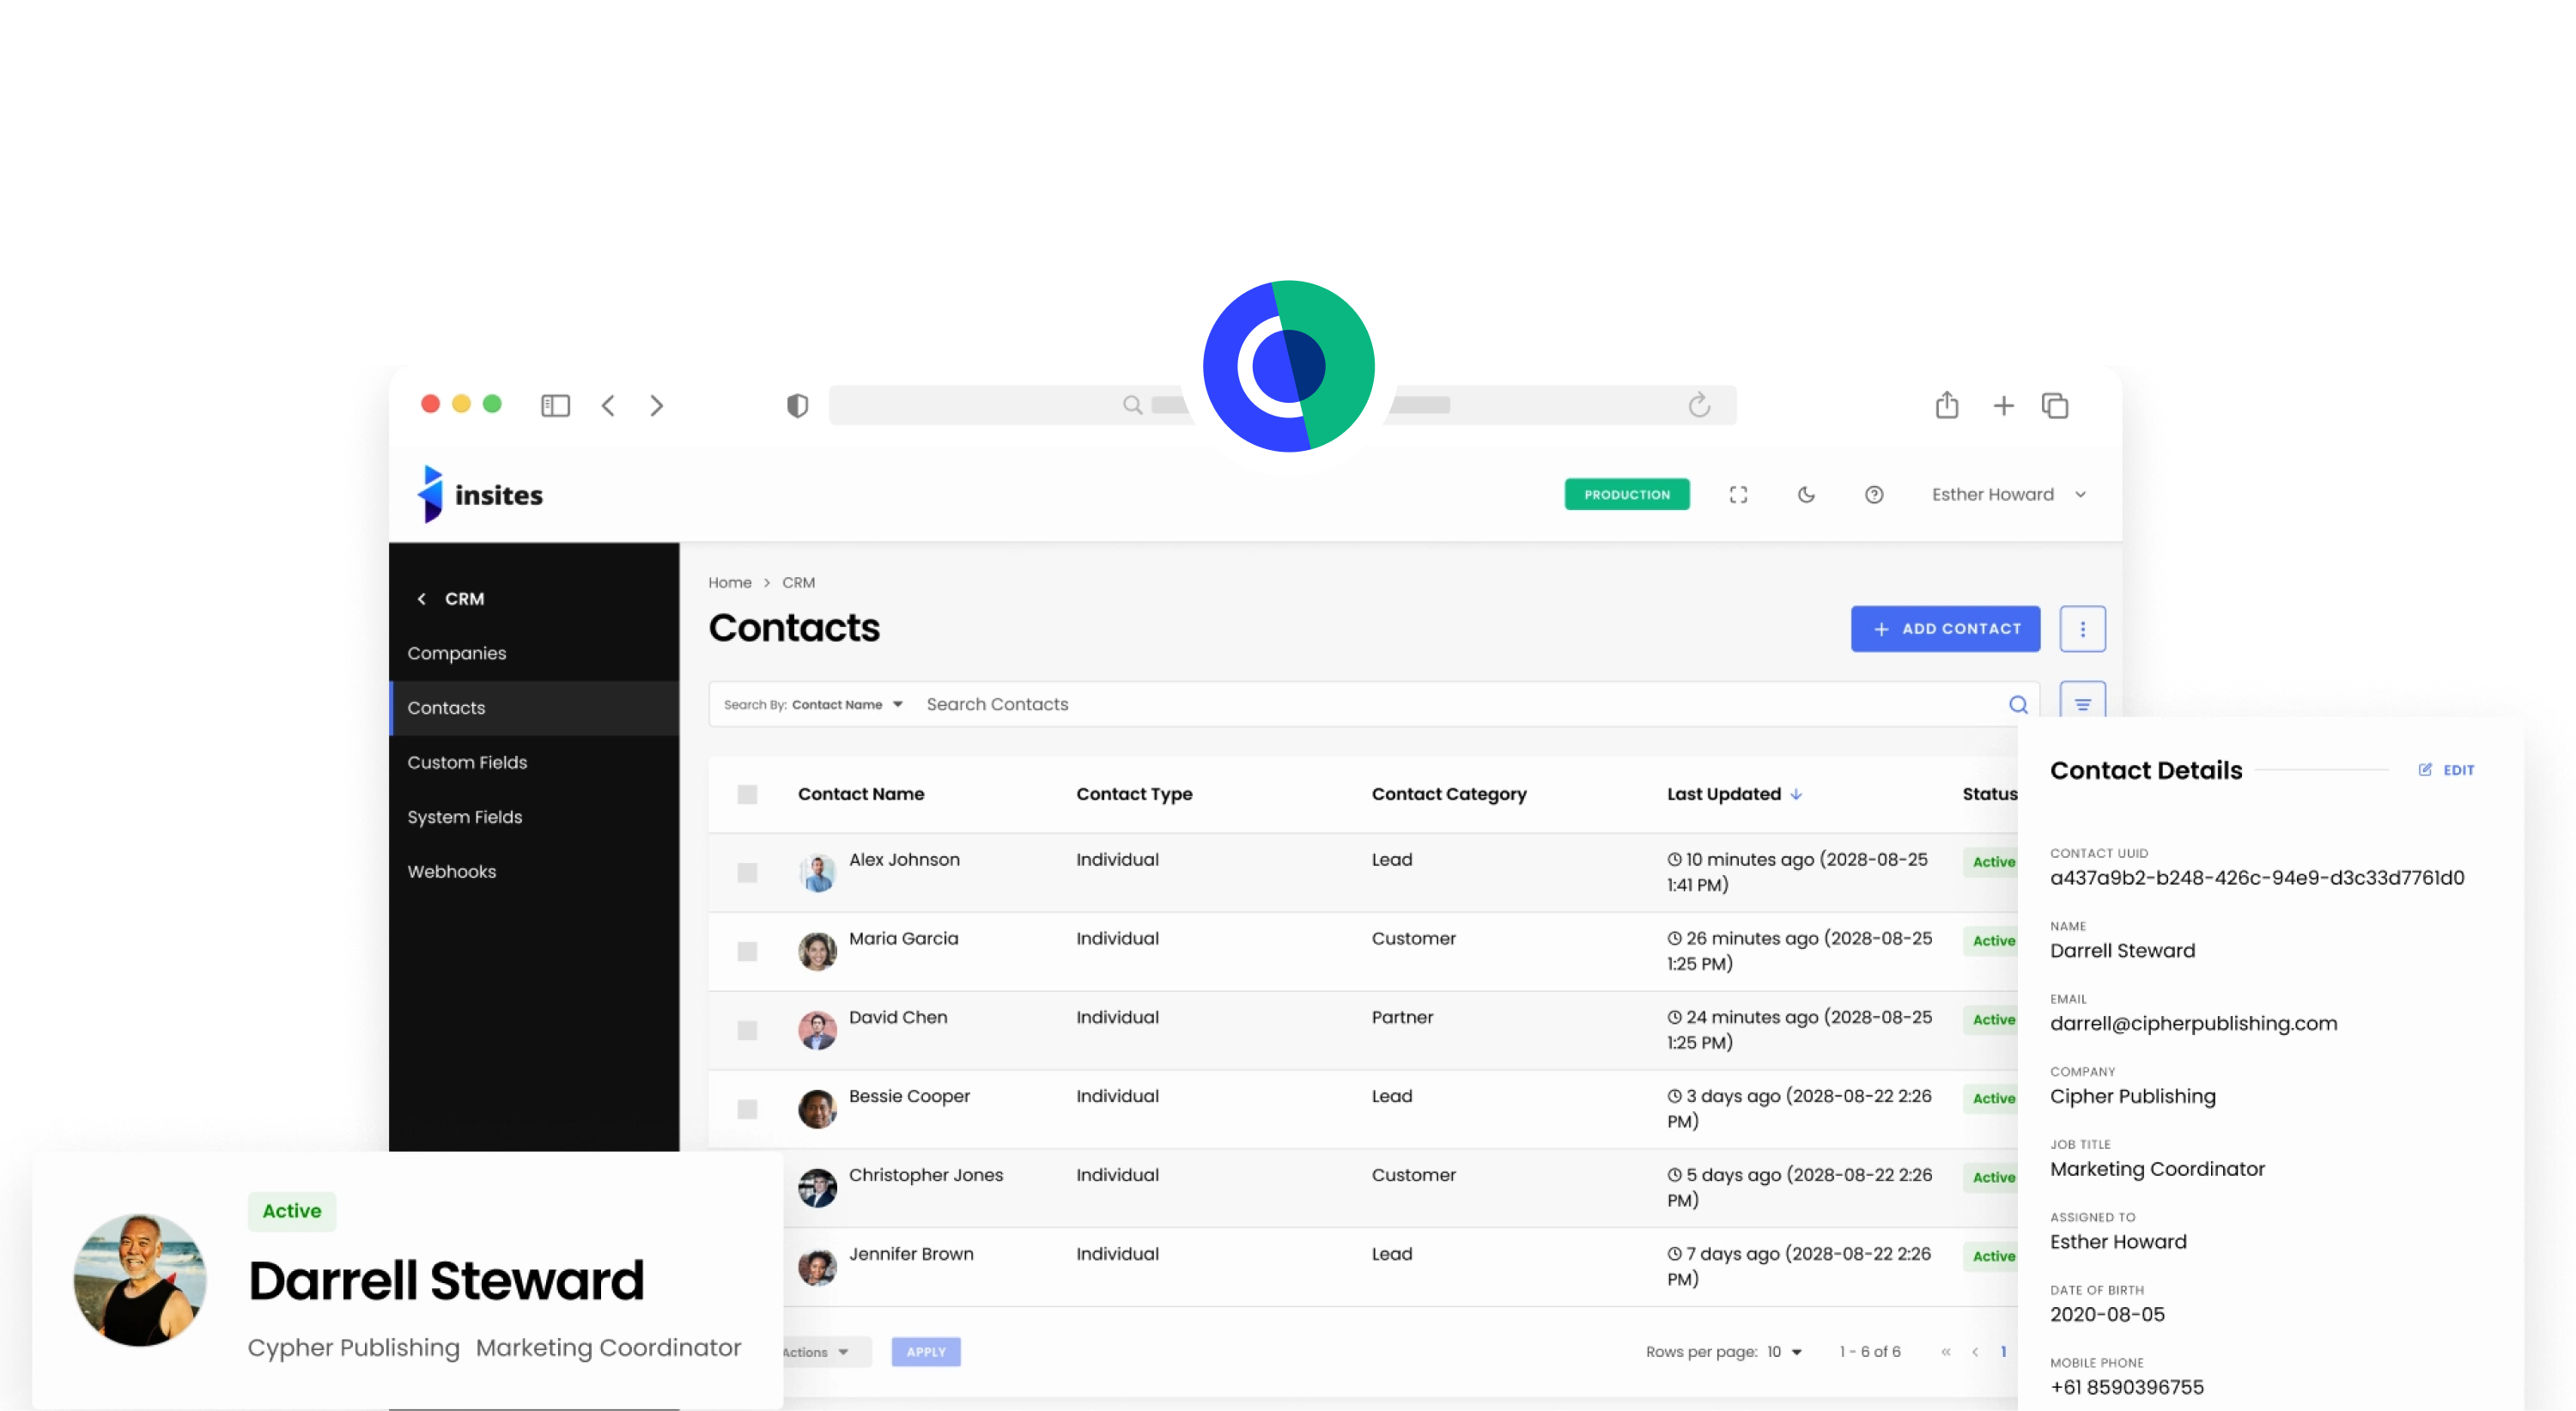
- Event Stream now records every create / update / delete made through the v2 API, matching the coverage already in place for admin-UI actions.
- Add
POST /crm/api/v2/custom-fields/contactsendpoint. - Add
POST /crm/api/v2/custom-fields/companiesendpoint. - v2 Activity responses now expose
created_by(set once at creation, immutable on edit) alongsidelast_updated_by, so the original creator stays visible after the activity has been edited.
Security
- Upgrade axios to ^1.16.0 to pick up upstream security patches; admin UI now handles 401 responses cleanly without throwing.
- Admin sessions opened via 2FA or SSO now respect the configured platform session timeout.
- Breaking — v2 API authentication failures now return an inline 401 JSON response (
{"error":"unauthorized"}) on the original URL across all HTTP methods. Previously the response was a 302 redirect to the login page; clients that followed the redirect must update to handle the 401 directly.
Breaking changes
- v2 action endpoints (archive / restore / complete / open on contacts, companies, tasks) switched from PATCH to POST. PATCH on these URLs now returns 405. API clients must update to POST.
- v2 DELETE endpoints now return 204 No Content (was 200 with body). DELETE against a missing resource returns 404 with a documented JSON body, and against a structurally invalid uuid returns 400 with a clean JSON body.
- Custom-fields create error response key changed from
errors(array) to singularerror(string). Clients that parse theerrorsarray on this endpoint must switch toerror.
Improvements
- CRM address autocomplete migrated to the new Google Places API (
PlaceAutocompleteElement), keeping the feature working as Google retires the legacy widget. - Settings → Instance Configuration: the page no longer flashes a "Failed to fetch Instance Configuration Details" error during the backend's reconnect heartbeat, and now connects through the production WebSocket endpoint.
- v2 API documentation refreshed across the board to match the v5.14.1 contract — HTTP methods, URL bases, request/response examples, body-field tables, and field-mapping notes have all been corrected and aligned with what the API actually returns.
Bug fixes
- Fix broken redirects when the configured
old_urlcontained a leading slash (was producing double-slash URLs). - Fix table pagination crash on CRM Tasks, CRM Activities, Tasks List, and Dashboard when loading a page.
- Task detail panel and edit drawer now reflect changes immediately after saving an edit, without needing a page reload.
- Partial PATCH on
/v2/contacts/{uuid}now preserves every untouched property — previously, sending only the field you wanted to change could either return a 400 error or null out the rest of the contact. - Fix task edit drawer showing the wrong due date for tasks that already had one stored.
- Partial PATCH on
/v2/tasks/{uuid}and/v2/tasks/comments/{uuid}no longer returns 400 when the request body omits a field; untouched properties are preserved, matching the contacts behaviour.
Cleaner asset API routes and a new credentials endpoint for S3 uploads
June 09, 2026
Breaking Changes
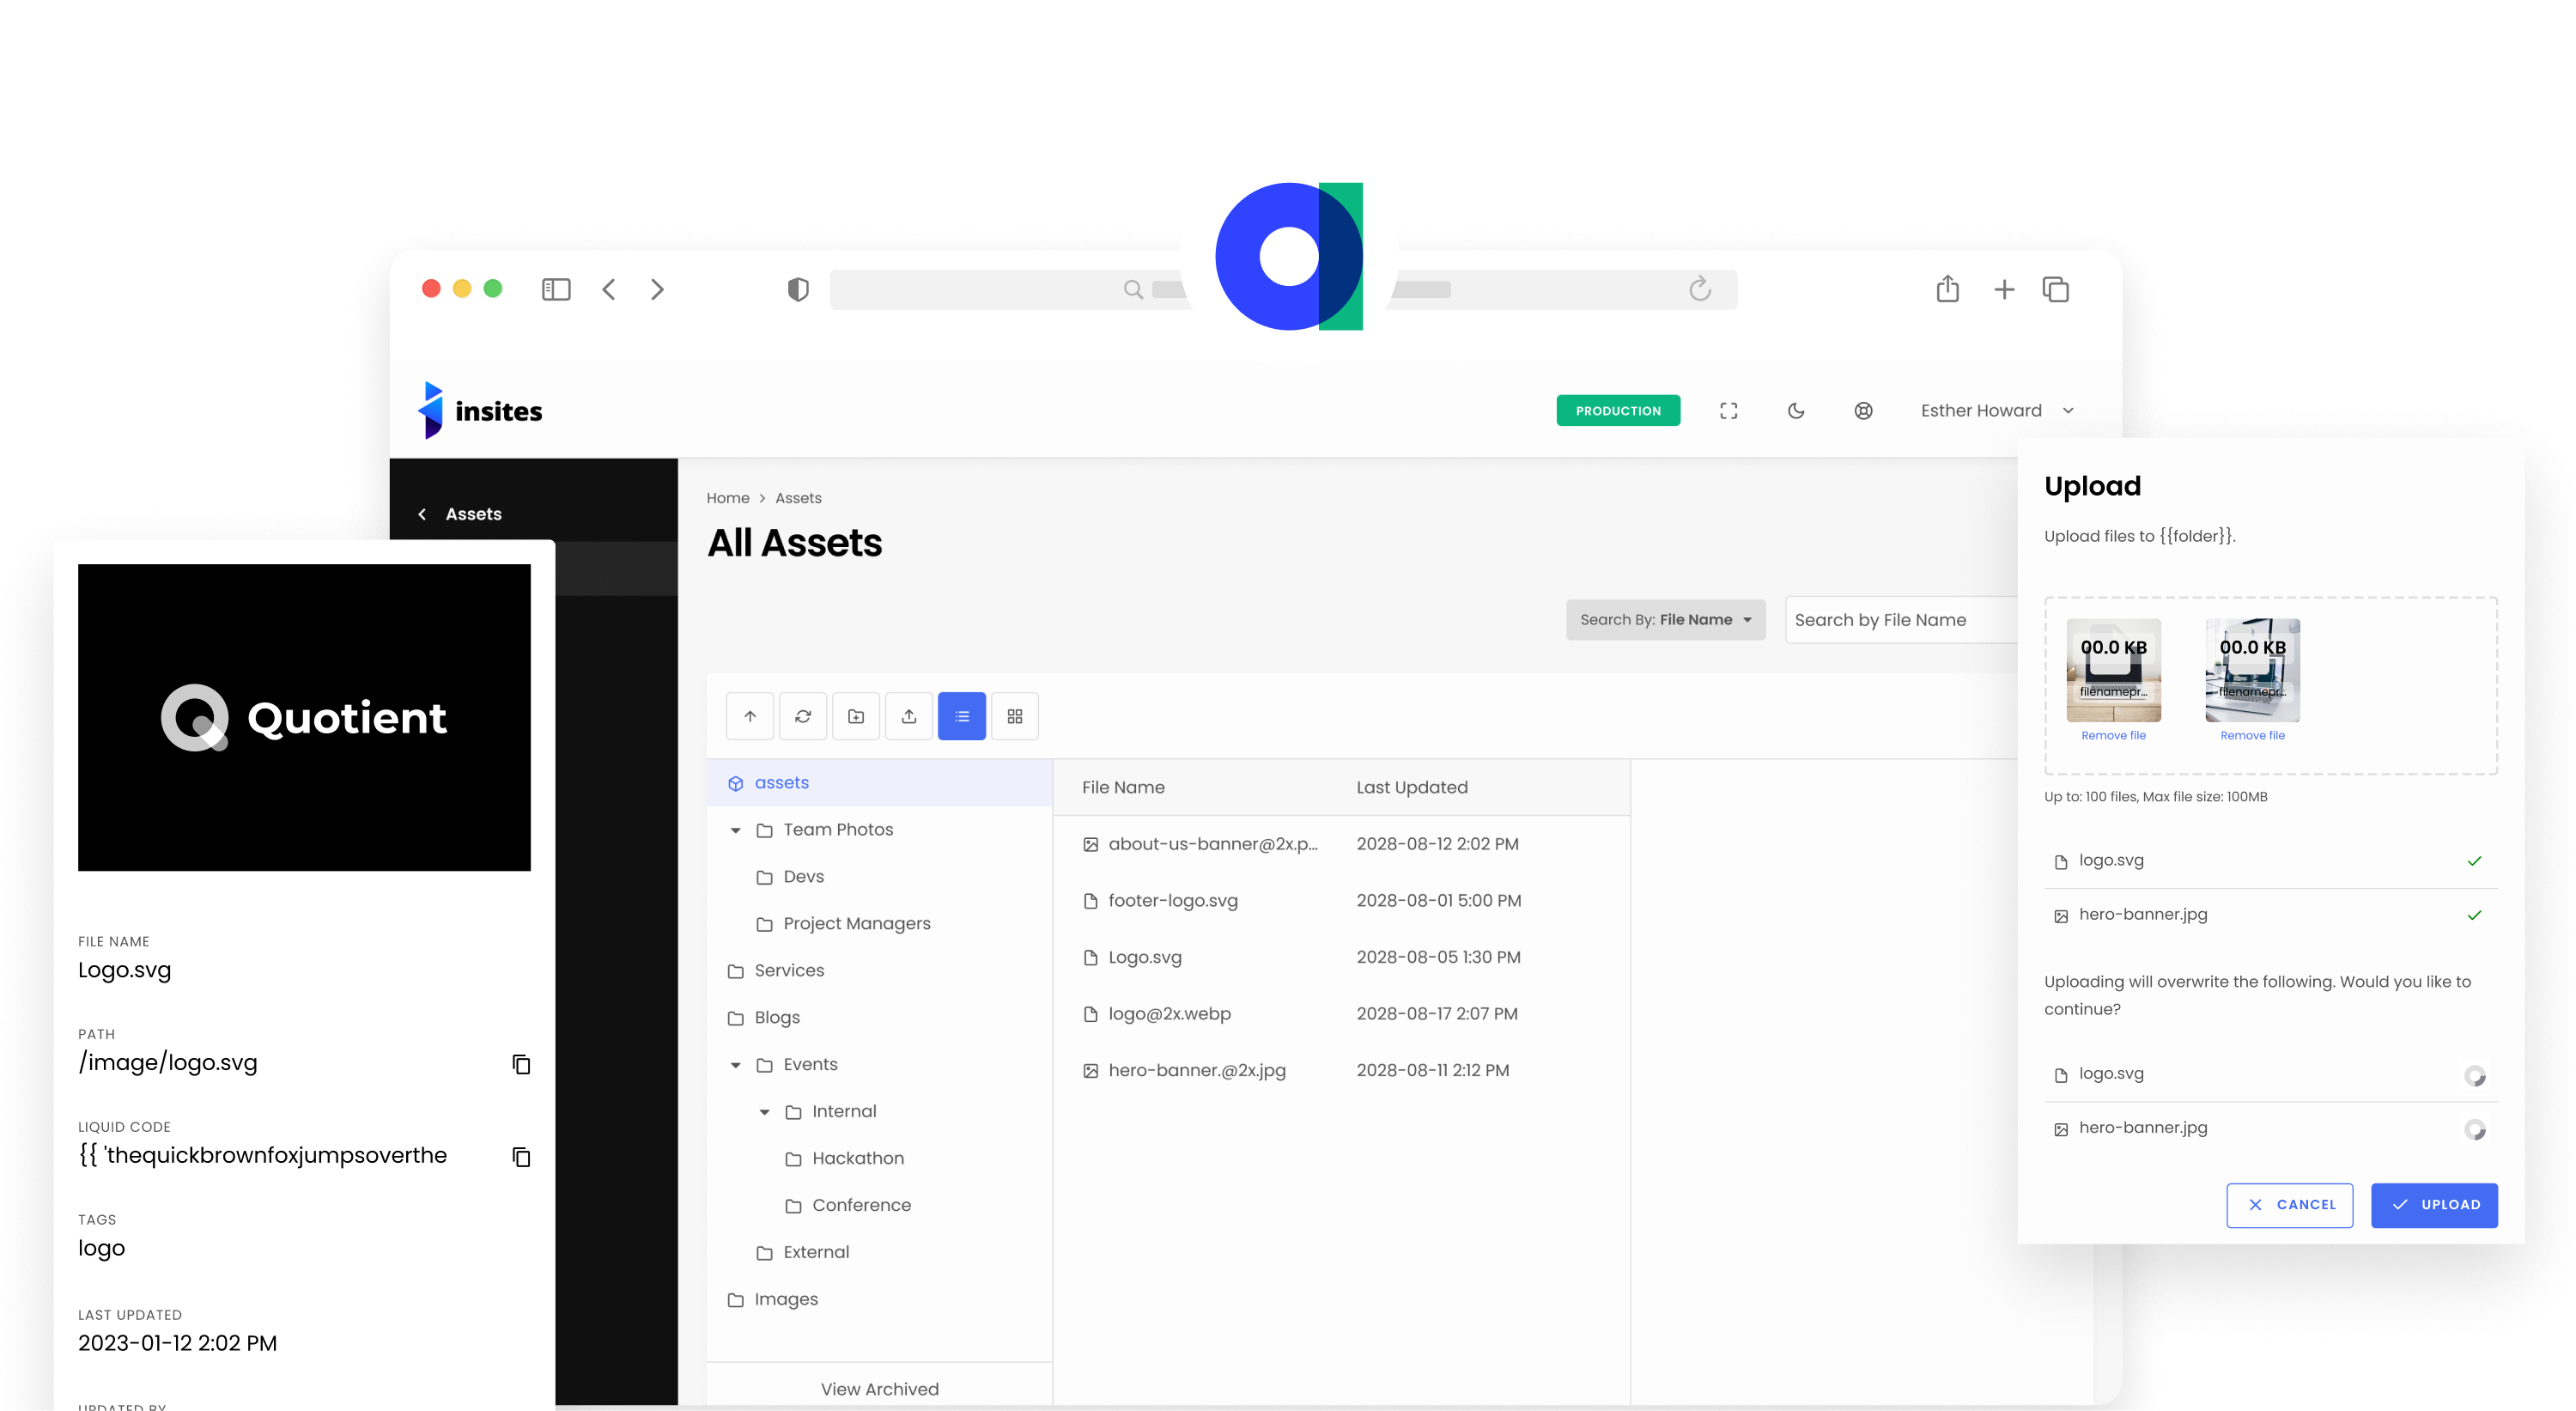
- Renamed external API v2 routes from
/all_assets/api/v2/...to/asset/api/v2/...for a cleaner public API surface. External integrators must update their base path.
New Features
- Added
GET /asset/api/v2/credentialsso external API consumers can retrieve the S3 presigned-POST credentials required by the Add Asset flow. Listed in the API documentation under a new "Assets Credentials" section.
Localized event times, richer filtering, and a more consistent ticket workflow
June 09, 2026
New Features
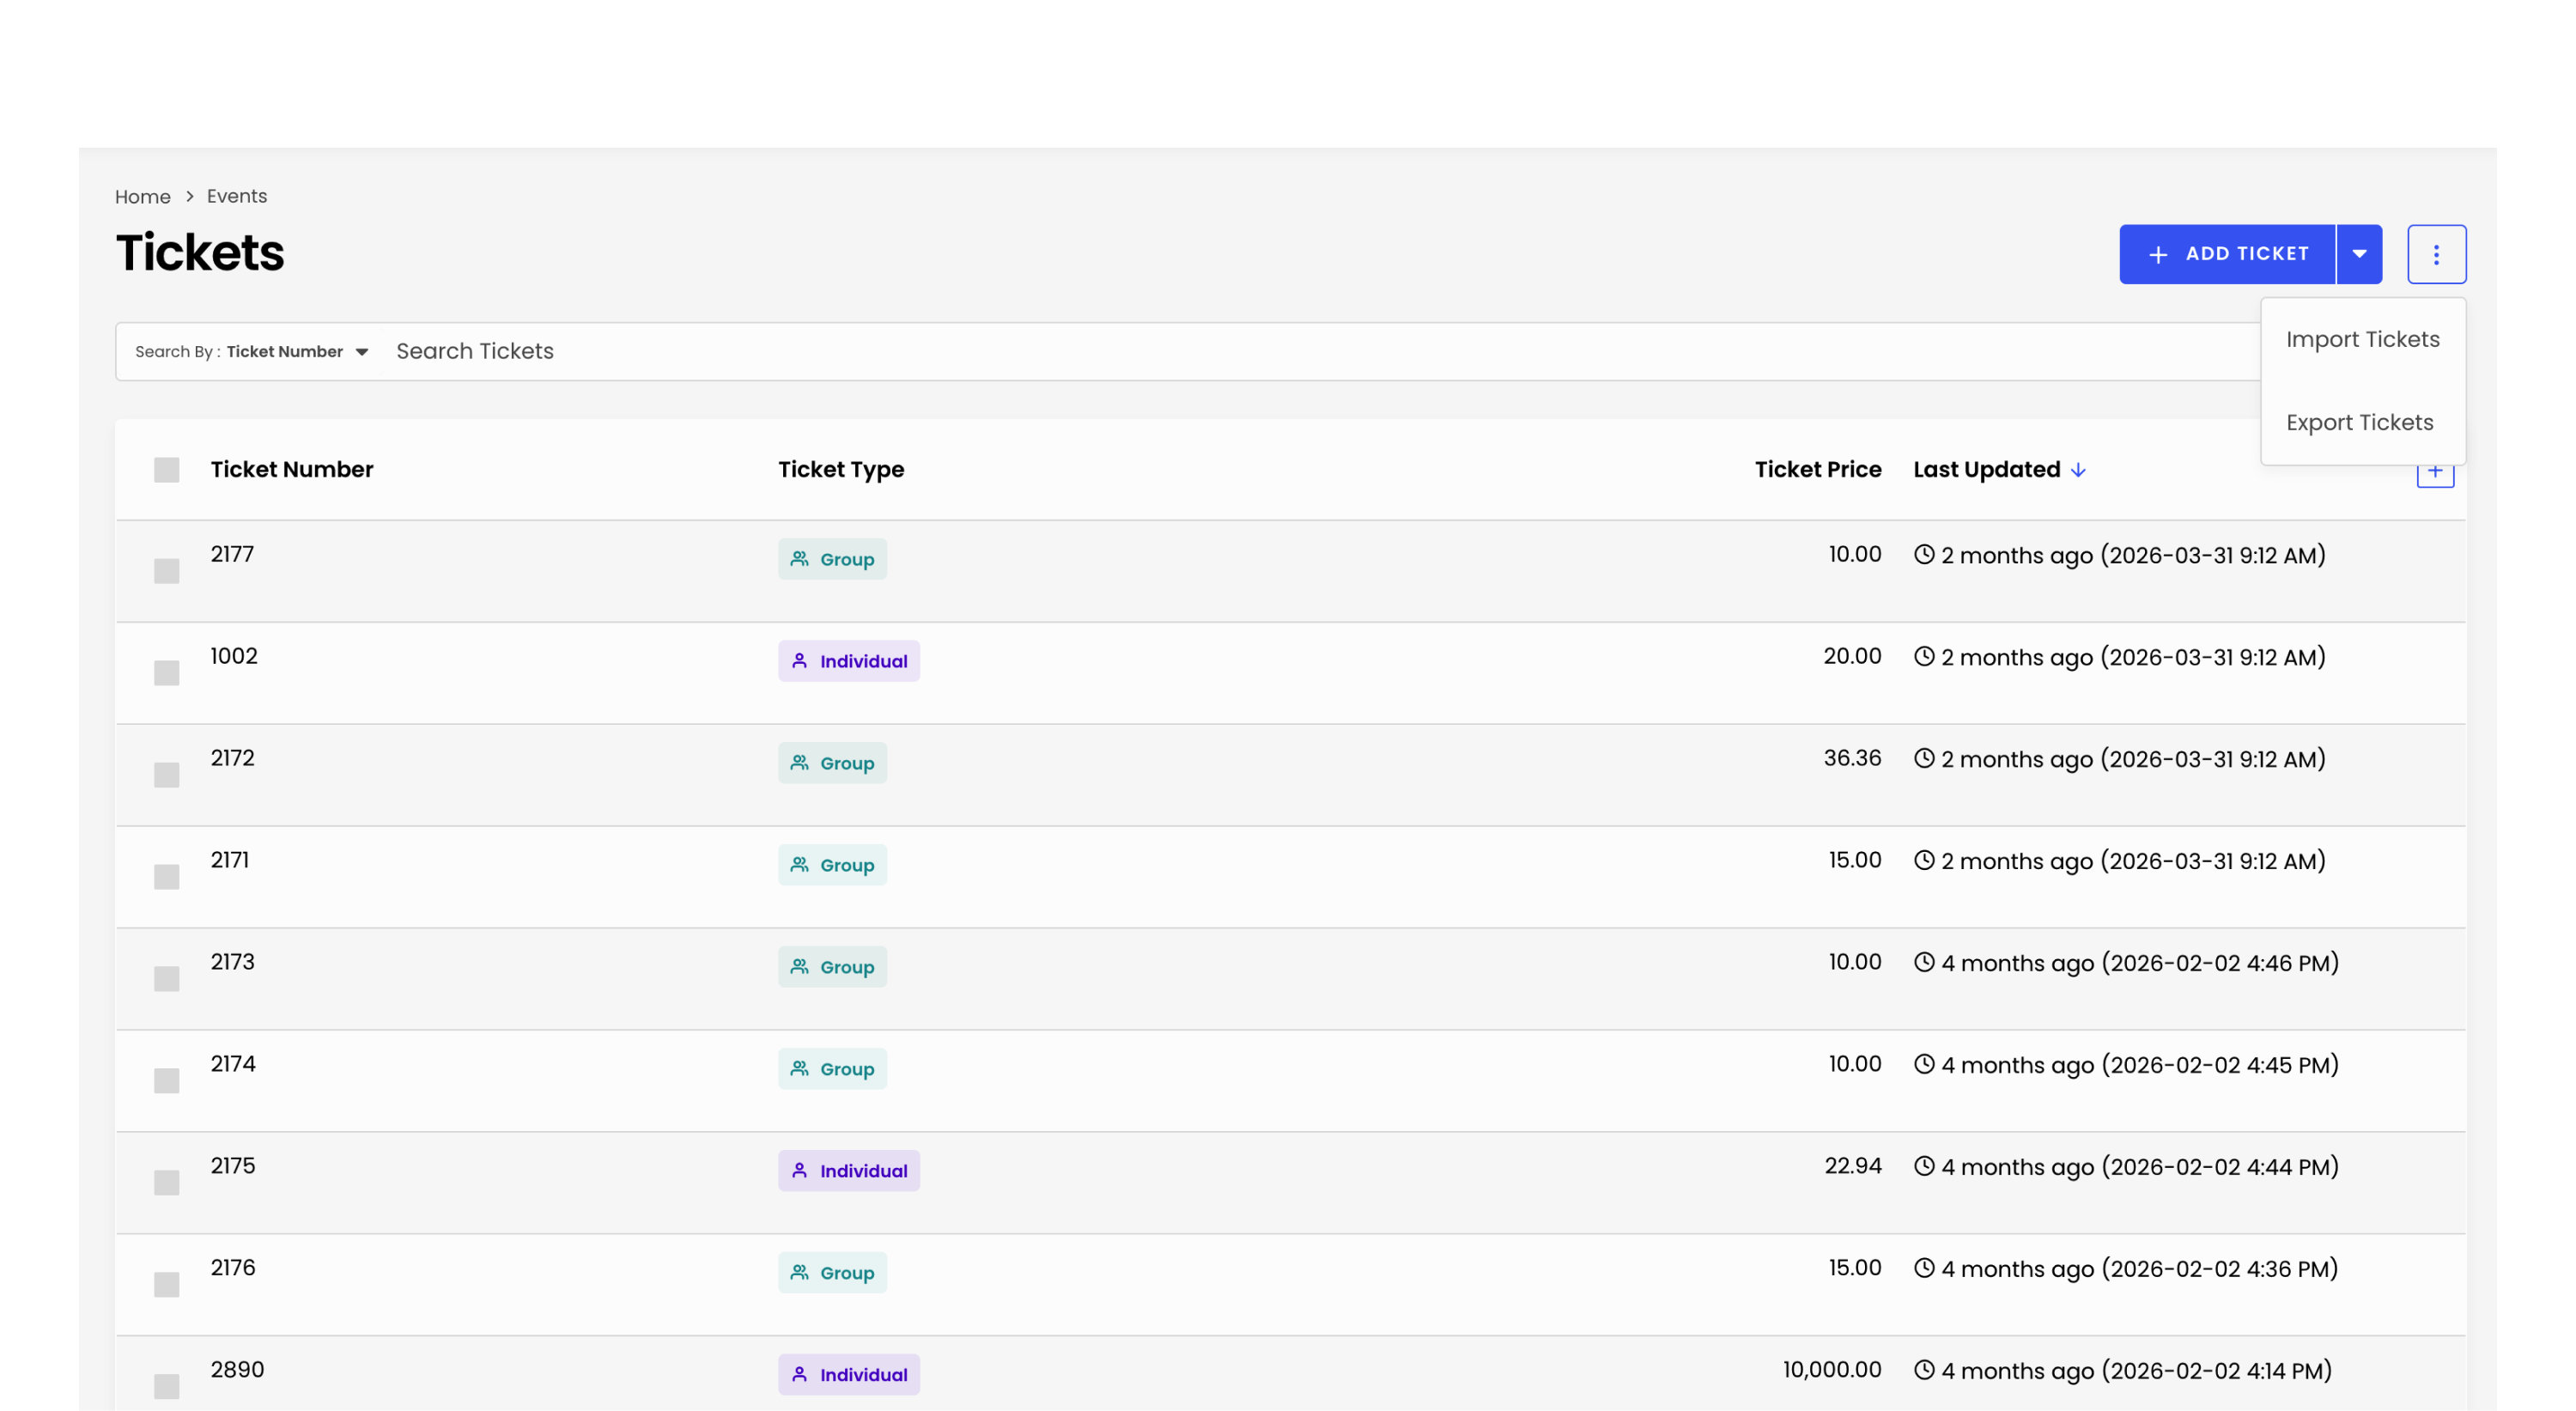
- Move Import Tickets from All Events page to Tickets page.
- Add additional fields to Advanced Filter for Tickets.
- Add link to CRM records on Ticket Details drawer.
- Add Event Name to Tickets export and fix import header mismatch.
- Render Events list date columns in device-local time.
- Show selected timezone on date field labels; update API doc descriptions.
- Sort display field options alphabetically by default.
Improvements
- Update v2 API update endpoints from PUT to PATCH.
- Remove event_uuid from Add Event Tickets example payload; move to controller_payload.
- Regenerate ticket PDF on contact assignment; add loading toast on View PDF.
- Update Sponsors list card layout to group company and sponsorship details.
- Load venue contacts from live venue record when editing event.
- Style circular avatar image on Sponsors and Speakers info cards; add initials fallback.
- Refine sponsor link layout, hit area, and ellipsis truncation.
- Update sponsor card company name and top-alignment styles.
- Update sponsor card link, separator, computation wrapper, and button alignment styles.
- Apply sponsor card styling to Speaker list cards.
- Centre-align Speakers card content and set inner gap.
- Venue contact card: hover/remove action, compact treatment, and button alignment.
- Fix venue contacts card on Event Venue tab.
- Fix duplicate contact re-selection in Assign Contact drawer.
- Enforce required fields on Events, Speakers, and Sponsors PATCH mutations.
- Enforce required fields on Tickets PATCH.
- Enforce question and answer as required on FAQs PATCH.
- Update delete confirmation modal content for tickets.
- Rename area card buttons; update delete confirmation modal for venues.
- Update delete confirmation modal content for system fields.
- Simplify delete pricing tier confirmation dialog text.
- Update division and pricing tier card action button labels.
Bug Fixes
- Fix sponsor link click opening edit drawer.
- Fix group ticket PDF empty content when created via API.
- Fix custom field time/datetime inputs to follow localization time format.
- Fix expense API docs showing incorrect required state for fields.
- Revert System Fields update endpoints from PATCH to PUT.
- Fix filter chips showing UUIDs for Purchased By Contact and Company fields.
- Fix failed to fetch data when filtering by Purchased By Contact/Company.
- Fix Category advanced filter showing invalid text conditions.
- Roll back Tax fields to conditional required and fix Tax* (%) label.
- Fix advanced filter chips not displaying dates using localization settings.
- Fix drawer delete not working on add event ticket list.
- Fix group ticket capacity error handling and drawer delete.
- Fix image upload failing on mobile.
- Fix date format in ticket PDF templates using day instead of month.
- Fix Company label in ticket contact details info table.
- Fix CRM Contact not prefilled when editing a speaker.
- Fix gross/net/tax calculation for expense and revenue fields in Events table.
- Fix page heading gross/net/tax totals and tax column display.
- Fix delete confirmation modals and wrong item deletion bugs.
- Fix ticket delete/PDF bulk action modal titles and button labels.
- Fix event date input/display timezone interpretation.


